what size key way to 7hp briggs and statton flywheel
I like to perform my own maintenance on my Briggs & Stratton engine and enjoy helping others do the same.
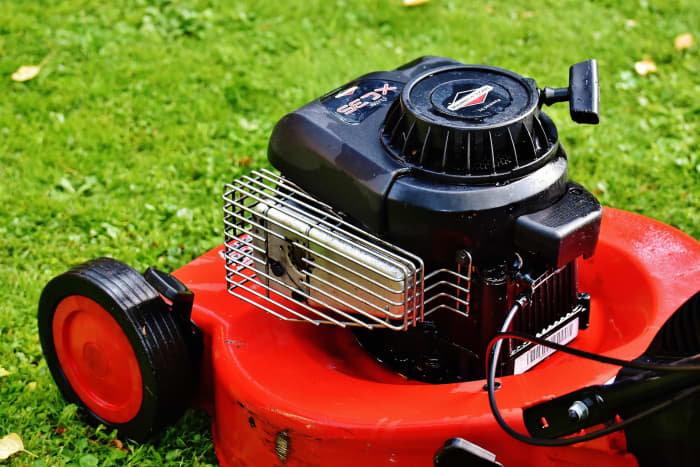
Before you shell out for an expensive repair to your Briggs & Stratton, read through this helpful guide to learning how to diagnose and fix your lawn mower's potential compression release bug.
Alexas_Fotos, CC0-BY, via Pixabay
Is Your Briggs and Stratton Difficult to Commencement?
Does the engine struggle to turn over, and it seems as though the starter must be bad or the bombardment dead? Is it time to pay big bucks for lawnmower repair? How volition you get that lawn tractor to the repair shop?
Before you lot exercise annihilation too desperate, keep in heed that it may non exist that serious of a problem. If this is an overhead valve (OHV) engine, and then it may exist that you have just overlooked a basic maintenance procedure. Sometimes you accept an easy repair on your backyard tractor.
Most of the overhead valve engines accept a pinch release feature that allows for the starter to non have to work hard to creepo the engine. It'south a slight raising, or crash-land, on the lobe of the camshaft. What it does is open the valve a little early to allow excess pinch to drain off. At speeds over 300 rpm, the tappet just sort of floats over this bump, and information technology has no result on engine operation. But at starting speeds, it'south essential, otherwise the starter just tin't turn the engine over.
If the engine volition turn over easily and hiccups, won't rev or brand ability, or just won't start, then you may be looking at a fuel supply trouble.
This guide will aid you diagnose and fix your difficult-to-commencement Briggs & Stratton engine.
How to Diagnose Your Backyard Mower Engine's Problem
To diagnose this problem, you will demand a voltmeter.
First, check the bombardment voltage by using the voltmeter on each battery terminal. You lot should accept almost 12 volts.
Adjacent, check the voltage at the starter with the key in the first position. You may need a helper at this bespeak, depending on the equipment. What you lot take to do is ensure that all safety features are activated merely every bit though you are starting the engine. With 1 lead from the voltmeter on the post, on the starter where the cable connects and the other leads to a expert ground such every bit the engine block, there should be about the same voltage as at that place was at the bombardment. A drop of a volt isn't a business organisation. If all this checks out okay, then it's a reasonable diagnosis to doubtable the compression release.
Proper performance of the pinch release requires proper valve lash adjustment. Adjusting the valves is a relatively uncomplicated project requiring only a few tools and once yous acquire how to do it, you should include it with your annual maintenance program.
- Ratchet with extension and 3/8", 7/16" and 1/2" sockets
- Feeler estimate in .004" and .006"
- 3/8" wooden dowel or substitute
- Torx or Allen driver to fit lock screw
How to Fix a Compression Release Problem in Your Briggs & Stratton Engine
- First, you lot need to admission the valve encompass. This will exist the silver comprehend on meridian of the engine head. It will have OHV stamped into it and is held on with four screws/bolts. These screws are usually three/8" or 7/16" hex caput and are removed using a socket and ratchet. There is a gasket betwixt the valve comprehend and caput. If yous are conscientious, you can ordinarily re-apply this. Then remove the spark plug.
- Now with the cover off, you lot can see the rockers, push rods, valve springs, and valve stems. The valves are the ones with the springs on them. If you plough the flywheel by hand, you will run into the valves move upwards and down and see how the assembly works.
- Find the intake valve. This volition exist the 1 that the carburetor feeds fuel and air into. If you remove the pushrods, typically the intake valve will have an aluminum pushrod, while the exhaust valve has a steel pushrod.
- You will need to plow the flywheel clockwise until you run across this valve open (motion downward) and then close over again. One time the intake valve closes, the piston will be headed to the elevation of its travel, or Top Expressionless Center (TDC).
- At this betoken, take the wooden dowel and insert it into the spark plug pigsty. You should feel the height of the piston.
- Slowly plow the flywheel by paw while holding the dowel against the piston, and you will experience the piston move. Exist conscientious doing this. If the dowel starts to go caught in a bind, dorsum the piston upwards and remove the dowel. Y'all just want the dowel in the cylinder when the piston is at or near the acme of its travel.
- With the piston at TDC, stone the flywheel back and along to discover the highest spot of the piston travel using your dowel.
- Find a spot on the head that'due south easy to see, and mark the dowel where it lines upwardly with that spot. Now remove the dowel and make some other mark ane/4" above the first mark.
- The valve lash should be set with the piston at 1/four" by TDC. What you are doing is making a judge to line upwards the piston travel with a reference point. Now put the dowel dorsum in, and rotate the flywheel so that the piston is now 1/4" past TDC.
- On the rockers, the stamped metallic pieces that open the valves, in that location will be a nut and a lock screw inside that nut. Unremarkably this spiral volition be a Torx caput, merely any it is, loosen it then loosen the retaining nut. You will discover the slack in the rockers, the corporeality of slack is what you are adjusting.
- For the intake valve, have the .004" feeler approximate and insert it between the valve stem and rocker. So tighten the retaining nut until the feeler gauge will simply barely slide in and out. It should be a snug fit, and the gauge should accept some resistance when trying to pull it out.
- Then tighten the lock screw back down. That valve is finished.
- Repeat the feeler guess process on the exhaust valve using the .006" gauge, and replace the valve comprehend.
- If the gasket tore when you removed it or it isn't in the best of status, you can either purchase a new gasket or practise what we do in the shop and utilize PermaTex Ultra Black to re-seal the valve comprehend. We also use anti-seize on the valve cover screws. Both PermaTex and anti-seize are available at any motorcar parts store, as well equally the tools required. (Notation: If you have a twin cylinder engine, you have to care for each cylinder separately. Yous accept to bring each piston to its respective TDC to arrange each cylinder's valves.)
- Once y'all have the valve cover back on, you're ready to get-go the engine. Don't worry if it's still doing the same as before. It usually take a few tries to do this correct if y'all've never adjusted valve lash. Only beginning over and endeavour information technology a couple more times if necessary. If you can't go it right later several tries, you may have a different problem which will require further diagnosis.
Thank you for reading this, and I promise information technology is of some assist. Several people have sent me letters asking for further help in diagnosis. But please understand, due to constraints within this type of forum, at that place is just no style for me to practise that here.
Briggs & Stratton Compression Release Set
Curlicue to Proceed
Read More From Dengarden
This article is authentic and true to the best of the author'south knowledge. Content is for informational or entertainment purposes only and does not substitute for personal counsel or professional person communication in business organization, financial, legal, or technical matters.
Dave Lovekin on June 10, 2018:
Fixed a compression blocked starter in 10 minutes. Swell article, cheers for submitting.
Shayne Campbell on May 09, 2016:
Information technology is a common problem likewise for the frazzle valve port to get hit, due to the cooling passages getting plugged with grass. This can cause the exhaust valve guide to slide out of the.passage and lock the valve up, causing the pushrod to bend. Fortunately if one is mechanically inclined, this is appx an $80 repair with oil, parts, and gaskets. To eliminate this problem in the future, I drill a hole in the side of the head where the frazzle valve guide is, and installed a loctited gear up screw into the valve guide, eliminating the possibility of any movement. I recommend the valve clearance adjustment annually, or equally the no creepo (high compression) issue resurfaces.
Doug Cutler from Temperance. Mich on August 14, 2015:
Later working on these blazon engines I decided to do a hub. Did a search to run into what hubs were already hither. Found this one. May do another explaining why the 1/4" piston down and the carb. flooding problem.
You would recollect the shops would know near these problems. I got one in to repair that had the additional problem of gas getting into the cylinder from the carb. needle not seating. That actress gas in the cyl. will practice the same as the decompression not working. I got the extra gas out and later on jumping the bombardment it finally started. It was then starting hands simply smoked badly. Turns out the the head gasket blew between the cyl. and push rod cavity. Some other common problem with these OHV engines. Inverse the gasket adjusted the valves. Engine returned to previous problem of not turning over. When it was starting hands and smoking desperately the burned spot in the gasket was a built in compression release. And then this means the pinch release pin on the intake lob of the camshaft is not functioning. This is why when adjusting the valves on these engines, with a properly working decompression system, the piston needs to exist 1/4" down to clear the pin. Next is to take the engine off and apart to ready the camshaft decompression organization.
James Rosen from Connecticut on August 02, 2015:
Thanks for this clear write-up. I just acquired a Husqvarna tractor with a 20 HP Briggs Intek single cylinder motor that would not start easily. I found the exhaust at 0.010 and intake at 0.005. All looked like new when I pulled the valve encompass no sludge or varnish. I reset both to factory spec using procedure you described and the motor at present starts easily and runs smooth. Just result left is it will run for about 10 minutes misfire ii-three times repeat this about 4-5 times and then stop running. A wait of 2-3 minutes and it will start and run fine for another v-x minutes and the cycle repeats. I plant the grey wire to the fuel cutoff solenoid partially melted to the motor heat shield simply still not the issue even later on repair. The engine has 438 hour run time on the tractor hour meter. Could this be the electronic ignition starting to neglect? I take an anterior timing light to check for spark during any misfire simply is there whatever better exam that does not require waiting for the misfire to happen short of supervene upon and see. Also the plug was blackness and moisture when pulled to set the valve lash. Is 438 hours on this engine considered a lot or should i expect many more with correct maintenance
James Rosen from Connecticut on August 01, 2015:
Cheers I have a 20 hp Intek single cylinder Hsuqvarna tractor but acquired equally a clear it out of my garage detect. I institute the frazzle at .010 when I checked and intake at .005 438 hours on the meter guess valves where never adapted. Used described procedure and starts like a gnaw. this was a great helpful mail. last result I have is after about 10 to fifteen minutes the motor starts to miss burn ii or three times in a row does this 4 or 5 times and so shortly dies. If I wait a minute or 2 it will start right upward and run with no problem for another short period of time. though I institute the issue with the grey lead to the fuel cutting off solenoid partially melted to the motor oestrus shield but no luck. Could this be the ignition module. The ability to restart after a brusk absurd down wait period seems to point there. I have an inductive timing low-cal ( yes I run sometime State Rovers which require old school tools) but have not checked for no spark however.
Is there any known effect with fuel pump or vapor lock on these motors.
is 430+ hours considered stop of life by Briggs for this motor.
bktrider on July 14, 2015:
Hi, had to register just to mail service this annotate: I have watched videos of this procedure and learn best from watching, however, his article was one of the best that I have read about any topic. You have first-class writing skills and I actually appreciate yous posting this article. A friend of mine has a Snapper with a 7 hp briggs and it is hard to start. I rebuild/cleaned the carburetor and it is still hard to starting time.....most 11 y/o mower, I will accommodate her valves and hope this takes care of her problem; I also remember briggs as being an outstanding engine and hope this turns out to continue to be the case.
Regards,
Brian
blmgtnman on May 27, 2015:
My rider has been and so hard to showtime these final 4-5 yrs. It's like it has a dead battery every fourth dimension I'd go out to try and get-go it. I knew the starter was good because it turns over easily without the spark plug. I've purchased 3 battery's for this passenger and finally gave upwardly two years ago subsequently a shop charged me several hundred and didn't get the engine to turn over like it normally should. I then bought a self propelled toro to keep my lawn looking decent. My bad! I'thousand very embarrassed right now.
I came across your commodity and your tutorial worked exactly as you described! At present I feel so dizzy for not knowing I should exist adjusting the valves on my Craftsman B&S 18.5 hp ohv intek engine every season. Considering of y'all and your article, I will perform this procedure first matter every flavor!
And yep, I constitute I needed to make several attempts adjusting the valves, but I eventually succeeded! The engine now fires off immediately! I'thousand not an engine person and rarely if ever will I attempt something similar this. I'm so glad I was fortunate enough to come across your article! And if I may, my wife couldn't be happier that at 65 yrs former, I'm back in the saddle again!
You Sir, truly are a gem and I wanted yous to know! Many, many thank you!! Hope yous have a wonderful day! Be well! Rick
Cardinal Fang on April 17, 2015:
I signed up here simply to say 'thanks' for this smashing, user friendly tutorial! I just saved loading up a zero plough mower & lugging it into boondocks, then leaving it for x number of days and then having them tell me (once again!) that information technology's a 'weak battery'.
Information technology took me maybe an 60 minutes, half of that fourth dimension was just gathering tools & printing out the tutorial above. Kickoff hitting of the key after doing this and it'southward purring like a rabid kitten on steroids. (Ok... so I demand a beer.) Either way - it starts like a dream and my original programme for this weekend was to weld up a total size car battery tray... glad I took one last look online and found this page.
Thank you again!
johng34 on September 25, 2014:
Thank YOU!!!
This was exactly my trouble, Briggs and Stratton 19.5hp. Only died during a mowing. The key for me was the high pinch inkling. Put a new bombardment in it and information technology couldn't plow the engine over. Two problems needed correcting before information technology would get-go.
1) Exhaust valve rocker arm had 3/8in gap, due to it'south mounting stud coming loose and bankroll out 3/8".
2) Intake push rod, aluminum, bent. Don't know how it got that way, could exist the steel cap on the peak of the exhaust valve, when it brutal into the lesser of the OHV well stuck in the intake valve on the way downward.
Installed new rod, loctite'd the stud back in, adapted valves as described herein. Started correct up. Put Kano Kreen in gas and oil, made it sound MUCH better right away. Going to prevent the input valve from sticking, which may have caused the bent push rod. Simply 160hr on this 4yr old John Deere, that I bought used.
THANKS AGAIN, I've no idea how much money you saved me!!!!!
PK Jones (writer) on Jan 15, 2013:
How-do-you-do, I actually can't practise diagnostics in this format. I'm not able to log in on a regular basis and this format just doesn't permit for it. I tin directly y'all to some other mail service I've fabricated at the following link:
https://discover.hubpages.com/living/Why-is-my-eng...
Information technology sounds like y'all take a a crankcase full of gas or a bad sabbatical.
Chuck 1 on January 06, 2013:
My engine was hard starting merely once it started ran skillful for x mins. I turn up the throttle and started off then it started smoking really bad. Fulled the garage with heavy fume. and and then died. I did not try to start once more. I took the valve cover off and information technology was full of oil and and air cleaner likewise had lots of oil. this is where I stopped. looking for answers to the problem. I side of the valve cover had oil rest. What should I look for at present????? i'm thinking the caput gasket and adjust the valves. Anything else????
PK Jones (author) on September 13, 2012:
The feeler gauge to be used is the apartment style. The round i would exist more than difficult to hold in place when tightening.
The side valve engines do take a valve clearance process but information technology would be more than I tin can explain in a short annotate. Typically if there's a cam wear issue in a side valve engine, complete disassembly is required and replacement of followers, cam or valves is needed. Or you may go away with TIG welding material onto the valve stem end and machining to shape, but that'southward also more than than I can explain here.
On the side valve engine, start with pulling the heads and cleaning the carbon build upward. Besides, you may have some other result than the compression release, that would require a good bit of back and forth and I can't do that here. Thanks!
cwatersjr on September 07, 2012:
Is there a style to check the valves on a 16 hp twin Two Non OHV engine that is doing the same symptons as the orginal problem in a higher place. Starter will only tunr the engine partially. If you take the plugs out it spins freely. Any suggestions would exist smashing..
cwatersjr on September 07, 2012:
Is in that location an adjustment on the valves when the motor is OHV? I have a BS 16hp Twin II that is having this issue only is not OHV.
andrewharshbarger on September 04, 2012:
what blazon of feeler gauge should exist used when doing this or does it matter
PK Jones (author) on August 31, 2012:
Hi, once yous have the piston 1/4 Inch past TDC, you adjust both valves at the same time, no demand to motion the piston over again. Now since this is a twin, you accept to ready the piston 1/iv Inch by TDC before adjusting on each individual cylinder. So you practice one cylinder, then rotate the engine for the other cylinder and adapt it.
c- stanfield on August 26, 2012:
exercise you lot have to bring the piston to i/4 by td. to adjust the intake valve so plough the engine again to adjust the exhust. i accept a xx hp. briggs vanguard twin cylinder. i adapted them the other day and i made it worse. was my first time. at 4-6 ths. but i adapted them at td. thanks for whatsoever help.
PK Jones (author) on Dec 14, 2011:
Robert is that the First part of the Family unit number or the Model number? If that's a Briggs engine, the model number is stamped into the valve embrace or on the sail metal.
Robert on December 13, 2011:
Any 1 know the valve lash on this model 2bu706 16hp ohv. I cant seem to find information technology on the chart. I appreciate the aid. THANKS
PK Jones (author) on December 12, 2011:
Yous tin alter the spark timing slightly by changing the air gap of the coil to the flywheel. Tight to the flywheel gives you a niggling advance, farther away from the flywheel retards the spark. On a stock engine, gaining that little accelerate improves performance. On nearly Briggs engines you lot tin can't dorsum the coil upwards far enough to keep it from firing, only the spark may exist tardily plenty to cause difficult starting and make information technology run a little weak.
The position of the flywheel on the crankshaft is the master timing. On a performance engine we will either employ offset keys to adjust accelerate or non even bother with a key and simply accommodate it according to dyno results. The fundamental is zilch more an alignment tool, information technology doesn't concur the flywheel in place, just offset keys brand aligning easier.
You typically won't run into any advantage to advancing the flywheel on a stock engine, but by tightening the coil to the flywheel you may. The gains are small, but every little scrap helps.
billybob on Dec 12, 2011:
Ignition timing is keyed to the crankshaft and flywheel.
Robert on December 12, 2011:
When i ajust the scroll to flywheel to.010 is this not the airgap ?
PK Jones (writer) on Dec 11, 2011:
Robert, I'grand afraid I cannot practise diagnosis on this site. But, if this is a Briggs Intek engine, and then employ the link to the Briggs spec canvas, http://www.nnyparts.com/briggsspec.pdf, and bank check your model number against that chart. The reason for using the manufactory adjustments is to prevent excess wear and ensure your valves are properly timed. Outside of the factory numbers, even by .001", will add vesture to the cam and rockers as well as reduce performance. At .002" lash, the valves are opening too early and staying open as well late, IF .002" lash is outside of the Briggs specs.
This will cause higher fuel usage also as a loss of power. On a 16hp engine you may not easily notice the difference, however put information technology on a dyno and you're probably losing ane/2 to 3/4 hp, which in a small engine is quite a bit. Also air-cooled engines are very dependent upon proper valve and ignition timing for cooling and the prevention of carbon build-up.
For maximum functioning on a stock engine, conform the valves to the tight side of the specification and adapt your ignition timing past making sure that the whorl is no more than the thickness of a dollar bill that's been folded three times. By having the coil tight to the flywheel like that, you advance the spark by maybe a couple of degrees which improves the fuel fire.
Remember, the lash adjustments are to ensure the valves are opening and endmost at the proper time on the cam lobes. Also loose on the valve that provides the compression release and you as well will either have no pinch release or it will be reduced, causing unnecessary wear on the starter.
Robert on December 11, 2011:
I BOUGHT THIS ENGINE USED AND IT IS 16HP ohv. WHEN I PUT THE ENGINE ON THERE, I CHECKED THE VALVE LASH.IT HAD VERY Picayune.I couldn't fifty-fifty get a .002 cuff to slide between the rocker and the pistom was upwards right.This engine is running good.Should i just it .004 and 006 what it calls for or leave it like information technology is? Kneed some assistance THANKS
PK Jones (author) on Dec 07, 2011:
Sad BillyBladez, I didn't mean for information technology to sound like you were Bob. Bob has used several different usernames to try and get posted and continues to endeavour and make insulting comments everyday. I was letting his posts without the proper name calling and insults through only enough is plenty. Good luck with your TroyBilt.
billybladez66 on Dec 07, 2011:
for the record pk, im non billy bob. I'm not gonna argue with somebody whose info saved my salary and my dough. For any reason a slight adjustment to the formula was what it took for me. Had it non been for your posts, i would accept been a sad sorry pupy about my troybilt. Yous but keep doin what you're doin and i'll be happy to read what your doing...thanks to ya!!!!
La Purisima Golf Form on December 06, 2011:
Cheers to that. Small engine mechanic and was needing exact specs.. Cheers Sick postal service 2morow and report results!!!
PK Jones (author) on December 05, 2011:
Bob, you lot said, "Yous said in the end you adjusted the valves at .008 and .005 . What else did you notice wrong ? Your saying that the engine was difficult to turn over. The valve adjustments being out that little wont make the engine hard to turn over." and so you said, "Just for your information... .002 of an inch is less than a slice of paper. Not very much.
So you are directly contradicting yourself. You can try to recover by irresolute your story but you actually demand to accept that in that location is a proper procedure and that beingness precise matters. Information technology'due south about likely that y'all are not being precise and therefore aren't really certain what your bodily lash is.
This volition be the last post of yours that appears on this page no matter how many different names you try to use. I take non allowed some of your other posts to appear considering of your tone and am agape that you lot acquit the distinction of being the commencement I've had to do this to. This is non a forum to argue, information technology's an information forum. If you would like to adjust your valves however you like, feel gratis. However Briggs has a item method they feel should be used and they would tend to know best. I've explained why the valves are prepare the way they are ready repeatedly and that'due south not my recommendation, it is how Briggs designed the engines.
Attend a few Briggs grooming classes, and feel free to debate with them and effort to convince their Engineers they don't know how their engines are put together. I've been attending factory small engine training since the mid-eighties and take yet to find a reason to tell a manufacturer that they don't know how to adjust their valves.
billy bob on Dec 05, 2011:
Yes .002" would make a divergence if the adjustment was "out of specifications" like for example .007" like your proverb. Im not saying that though. What Im proverb is I can adapt the valves at .004",.005",.006" or annihilation in betwixt .004" and .006" (which is a .002" difference) and according to the manufacturer they say this is fine considering these are the bodily specs. their recommending. What your telling me is this .002" divergence is not acceptable. Tell me what yous would prepare the valves at if the recommended specs. were between .004" and .006"
PK Jones (author) on December 05, 2011:
Call back about it similar this. As the lobe on the cam turns and the lifter follows it, the lobe begins to lift the lifter. If your lash is also tight, the valve volition be opening early the lobe'due south travel. If it's loose, it will open up late on the profile.
From .004-.006" is the amount of lash required to open the valve at the proper time on the lobe. Add .002" to the gap and the valve will open up many degrees afterwards the lobe than if information technology were at .006". The lobe has a very sharp ascension once you enter the ramp so even .002" will exist a large change. From .004-.006" in this case starts the valve opening at the proper point on the cam lobe.
Valve lash is an adjustment made to command the opening and closing timing of the valves. The valves have to offset to open and shut inside a narrow window on the cam's profile. Most people think valve lash is set to control the total elevator on the valve, but it'southward not, fifty-fifty though lift is affected. It's all near the proper timing of the valves.
The manufacturer does say .002" makes a difference, attend any Briggs training schoolhouse and they volition encompass clearances repeatedly. .004-.006" is the adequate range in this example. .007" would be out of spec.
billy bob on December 05, 2011:
Your missing my point. If the manufacturer is giving me specifications like .004" .006" for the valve adjustments it means a minimum of .004 and a maximum of .006 . When I went to schoolhouse they told me there is a .002" difference betwixt those ii measurments. Why is the manufacturer maxim .002" wont brand a difference but your saying it will ?
PK Jones (author) on December 04, 2011:
.002" is enough to make a difference when you are adjusting valves. Set the intake lash at .002" when the engine likes .004" and most engines will start popping as the intake begins to open several degrees early.
Valve lash is almost when the valve starts to open. Besides loose and the valve opens late, as well tight, the valve opens early. This is why most people have to try several times before they get it right. The reason you turn the engine i/4" past TDC is because of the cam's profile. This is how Briggs designed the system, and how the valves on these types engines are adjusted. The slight ascension in the profile that creates the pinch release does clothing which will alter the measurements, which is another reason why you adjust at 1/4" past TDC.
billy bob on December 04, 2011:
If .002" is going to make a difference why are the specifications between .004 and .006 ? These specs mean your adjustments tin exist either .004 or .006 or anything in between. Which is a .002" divergence. This is why I set mine at .005" It runs fine.
baton bob on December 04, 2011:
I think your referring to .004 and .006 equally being the limits. .004 existence the smallest and .006 beingness the largest setting. Like I said earlier... I adjusted both valves at TDC to .005" (middle setting) and the followed your proceedure of turning the crank another 1/4 " past TDC and my original settings of .005" were the aforementioned. I found no deviation.
PK Jones (author) on November 30, 2011:
.002" is enough to make a departure with the compression release. Although setting the valves tight is preferable to loose for performance issues. That said, not all OHV Briggs engines utilise the .004 and .006" specs, just most. I wrote this referring to Lawn Tractors specifically, which when having OHV Briggs engine, will accept Intek engines 99% of the fourth dimension and utilize the .004-.006" lashes. If in doubtfulness, only refer to the Briggs nautical chart at this link, http://www.nnyparts.com/briggsspec.pdf
billy bob on Nov 30, 2011:
Simply for your information... .002 of an inch is less than a piece of paper. Not very much.
billy bob on November 30, 2011:
You said in the end you adjusted the valves at .008 and .005 . What else did you find incorrect ? Your saying that the engine was difficult to turn over. The valve adjustments beingness out that piffling wont make the engine hard to plow over.
billybladez66 on November 27, 2011:
great mail service. Had to attempt it about 4 times before i finally fabricated progress. In the stop i wound up setting the frazzle at .008 instead of .006 and the intake i prepare at .005 instead of .004. After setting it this mode my flywheel finally purred over nice and smooth without the help of a jump start from the trusty F100. This is something i will brand sure to keep on centre on from now on. Btw, on my troybilt (2002, 18 hp ovc) my exhaust valve was on top every bit i faced the engine. I could tell considering the exhaust pipe was attached at the height, to the left of the valve, and then i assumed information technology to exist exhaust.
robare15 on November nineteen, 2011:
I had the aforementioned problem with my sixteen.5 Hp Briggs engine.
The instructions here are splendid and helped me solve the problem.
Notwithstanding, not before frying a starter motor.
I bought a new starter from dbelectrical.com ($43)and my tractor starts like new.
PK Jones (writer) on November 15, 2011:
My argument reflects that if one valve is completely open up, so the other valve would be at the same position equally it would be at TDC, meaning information technology would exist closed. Not that both valves are completely open. The inherent trouble with using this method on Briggs engines is that the valve needs to be in phase on the cam with the piston 1/4" past TDC. The method of adjusting valves with one fully open and adjusting the other valve is an erstwhile method used on many pushrod engines. You simply bring ane valve fully open, rock the crank dorsum and along to find the loosest spot in the other valve's lash and then adjust. Then repeat for the other valve. People have been using this method for decades on all sorts of engines, works pretty well for multi-cylinder engines when y'all don't have a book to tell you what cylinder corresponds to the other.
Frank on November xv, 2011:
This is what you've stated..."Having 1 valve completely open would have the other at the same position." Its incommunicable to have both valves "completely" open. Unless theres a problem with the engine timing.
PK Jones (author) on November 08, 2011:
On the Briggs engines it's important that you are across Top Dead Centre and have the cam at the right position, which is the reason for going 1/4" past TDC. Using the method you mention, it would be hard to know but where on the cam's contour y'all are. Having i valve completely open would accept the other at the aforementioned position as at TDC and then y'all would take to try to gene that in on each valve. Not that information technology couldn't work, simply that the method in the article is the easiest way and insures both valves are adjusted in phase.
kandk920 on November 08, 2011:
I accept as well seen the valve lash adjusted past rotating the engine until one of the valves is completely open, and then adjusting the lash on the valve that is closed, then repeating for the other valve. How is this unlike than the method you explained? Thank you
PK Jones (author) on Oct 17, 2011:
How-do-you-do, I can't exercise diagnostics on this site due to an agreement with another site and the format of Hubpages really doesn't allow well for it anyway. I will tell y'all that the muffler glowing reddish is probably an overly lean status in the carburetor. Pull the spark plug and information technology'south probably grayness and ashy. This would mean yous have a carburetor that needs to be rebuilt or replaced most probable, although an air leak could also cause this. There are a few other things that could be responsible but that would crave more indepth diagnostics and I just can't practise that hither. A carburetor outcome would be the most probable though.
If you wait at the intake manifold, you should exist able to see that it is in line with the intake valve, same for the exhaust valve and the exhaust manifold.
Bob on Oct 16, 2011:
Deplorable Nick. The intake is unremarkably larger and frazzle is usually smaller. The valve your describing on the top , is the intake.
Bob on October 16, 2011:
Hey Nick. The intake valve is usually smaller and is in the cake closest to the carburater. The exhaust valve is usually larger and in the block closest to the muffler. When your asking if the valve is closest to the pinnacle... Im gonna say your describing the intake valve.
nick on October 16, 2011:
Hello,New to this just how do you know what valve is the intake and what valve is the exhaust?Is the valve closest to the top of the engine the intake or exhaust?
Thanks,Nick
Bob on Oct xvi, 2011:
The muffler was glowing red on my old Briggs. Is this because the valves are out of adjustment ?
PK Jones (writer) on September 17, 2011:
Thanks!
Jerel on September 17, 2011:
Hey there, I am a 15 year veteran automotive technician with much experience in minor gas engines. I had never ran into this ane and the post helped a bunch.
dave on September fourteen, 2011:
Finally someone explains why it needs to exist i/4 by TDC.
I've e'er been curious.
PK Jones (author) on September 12, 2011:
Hi, I can't really diagnose in this forum. If the engine is still hard to turn over then yous may have another effect or even a worn cam. Information technology would require a practiced bit of back and along to work through information technology and I'm merely not able to exercise that hither. Thanks, PK.
Joe on September 12, 2011:
I adjusted the valves to .005" at TDC and and so checked the valves a ane/4" past TDC and at that place was no divergence. The engine runs fine.
PK Jones (author) on September 12, 2011:
The valve stems shouldn't have any lateral movement, just upwardly and downward. If the valves are moving around side to side, then the guides are probably bad and caput replacement is the all-time prepare.
Jack th wack on September 11, 2011:
I will attempt your procedure. My initial problem was a cleaved push button rod. I put it all back together just it just ran for a infinitesimal. . . Roughly at that. I Q though; The valve shafts are grooved circumferencely. If the valve shaft is supposed to be locked in and movement only within a certain range, is information technology possible that they tin can move out of place within a range of travel resulting in a gap so wide information technology can't be adapted to spec.? The rocker arm so flops effectually all over the place. More after I try the valve lash adj. Thank you for your help.
(Engine is a B&S model 310707, type0136-E1, 16HP Sears riding mower)
Nib on September 03, 2011:
Thanks for the tip. I replaced the caput gasket on my craftsman lawn tractor, and afterwards information technology was difficult to start with the symptoms yous described. Did the process, and it works like a champ. Hardest role was finding a feeler gauge. (Went to Walmart and Ace before going to an Auto parts shop).
PK Jones (writer) on Baronial 31, 2011:
The way the camshaft is footing requires you to motility the piston 1/4" past TDC so that you accept an accurate lash. Adjusting at TDC on many Briggs engines will requite you too loose an adjustment. Other makes, and some Briggs engines, can be adjusted at TDC.
Joe on August 29, 2011:
Why do you take to continue to motility the piston some other 1/iv of an inch by TDC ? Is this minor movement going to make a difference ? Thank you
dakota on Baronial 12, 2011:
My mower started doing this very exact matter this week. I went thru the entire electric from battery, sol and removing starter to test it. Removed plug engine spun fine, replaced plug and as soon as it hit pinch it stopped. I can jump information technology with a jump box it does fine. Tomorrow I will exercise the in a higher place to the letter of the alphabet I will let you know. Thank you lot for your commodity. I feel certain its this.
Todd on July 30, 2011:
This is and then true. Ive been building motors for my belatedly model for xviii years and winning on skilful nights. Never thought my 14.v BS had a valve lash issue. Ive been starting it with a jumper box all f due north twelvemonth. 20min an it is dorsum like new. I used a pencil for the TDC -one/4 worked keen. Thanks saved me buying a passenger. I time a rain out at all iii tracks was worth it.
Mike E. on May 15, 2011:
thank y'all, Exactly the problem .
PK Jones (author) on April 13, 2011:
Glad it helped you lot. Remember to include valve aligning as an almanac maintenance item.
J. W. on April 13, 2011:
Take had starting problems with my Sears riding mower for over 2 years. Last summer (2010) paid some minor engine "expert" $180, and he replaced the starter and battery. Same problem afterwards he left.
Saw your article and tried it. Had never adapted valves on whatsoever type of engine. Took me a few tries to "get the experience" of what I was doing, but finally put the valve encompass back on and gave it a effort.
ENGINE STARTED IMMEDIATELY AND CONTINUES TO Practise SO. Thanks very much for your valuable info.
Al on March 01, 2011:
That did it! Intake valve adjustment was .oo6" instead of .004", once adjusted correctly it made all the difference in the world.
Thank you for posting!
Marker on January 29, 2011:
The engine on my Craftsman lawn tractor would only crank once and not beginning. I was thinking information technology was the starter but found your article, followed the steps, and it started right up. Thanks.
PK Jones (writer) on October 22, 2010:
Glad it was of some help. It's surprising the number of shops which fail to catch this one.
Marking on October 15, 2010:
Thank you a ton. Brought my Rider in twice to have the effect looked at. They just kept telling me the battery was bad. It took me 15 minutes outset to finish and the engine starts and runs like a peak. Yee Ha!
PK Jones (writer) on June 12, 2010:
Hi, yes, the engine needs to be at 1/4" by Top Expressionless Center (TDC). At TDC, the intake valve has just closed and the frazzle has non begun to open up. The piston must be at ane/iv" by TDC, so be sure to follow the instructions above for how to discover that spot.
D.J. on June 11, 2010:
does the piston need to be in same place for the intake and exhaust valve to exist adj.?
PK Jones (writer) on April 18, 2010:
Cheers! I'm glad information technology helped.
Pdemps on April eighteen, 2010:
Thank you, very helpful and save me $$. I appreciate it, best written article on the subject field I could find.
PK Jones (author) on Apr 03, 2010:
Thanks for reading it.
electricsky from Northward Georgia on February 27, 2010:
Give thanks you for your article
Source: https://dengarden.com/landscaping/Hard-to-start-Briggs-and-Stratton-engine
0 Response to "what size key way to 7hp briggs and statton flywheel"
Post a Comment